The correct desk height is the single cheapest upgrade in any workstation, and almost nobody measures it. I’ve spent years treating my own desk like a bench — every frame load-tested, every chair lived in for months, the whole geometry written down in a setup log in centimeters — and the recurring lesson is this: before you spend a krona on a new desk, chair, or arm, you can fix most of your daily comfort by getting the height numbers right. This guide is the measurement-first method I use, and it tells you to buy nothing first.
I’ll be blunt about the framing up front, because it matters for what you’re reading: this is a comfort-and-geometry guide, not a medical one. I talk about elbow height, eye line, monitor distance, and fatigue — the dimensions you can measure with a tape and feel by the end of a long day. Where I reference research, I’ll say “studies report” and point you at the source. I’m an engineer who lives at his desk, not a clinician, and the line between those two never gets crossed here.
Why desk height is the free fix nobody runs
Walk into ten home offices and nine of them have a desk at a fixed 73–75 cm — the default that the furniture industry settled on decades ago for an “average” person writing by hand. The problem is that almost no one is that average, and almost no one is hand-writing anymore. A fixed desk height that ignores your own forearm length, chair height, and keyboard thickness is a guess, and a guess that’s even two centimeters off is something you feel by 4 p.m.
In my setup log, the difference between a desk dialed to my elbow height and the same desk left at the factory 74 cm was the difference between a forearm resting level and a forearm angled up to reach the keys — wrists cocked, shoulders quietly climbing toward my ears over the afternoon. Nothing dramatic in any single minute. Just a slow tax on comfort that compounds across a Swedish winter of long indoor days. That tax is free to remove. You don’t buy anything; you measure, you adjust, and you log what worked.
That’s the doctrine of this whole site and this cluster in particular: geometry before money. A perfectly dialed budget setup beats an expensive one left at default numbers every single time. So we start with the math, and only later — in the full setup breakdowns and chair reviews — do we talk about what’s worth buying.
The one number that matters: elbow height
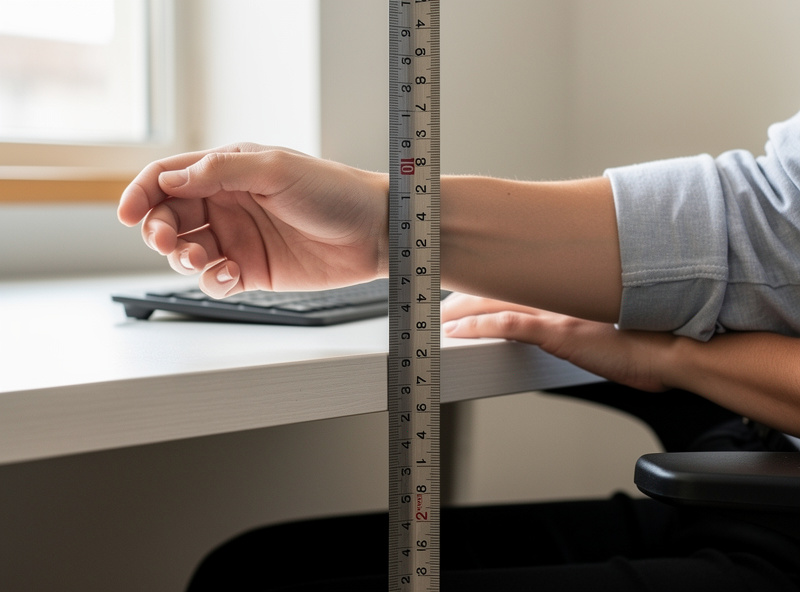
If you remember nothing else, remember this: your working surface should sit at your seated elbow height. Not your height, not a chart on a product page — your elbows, when you’re sitting the way you actually sit.
Here’s the method I use, and it costs the price of nothing because you already own the tape measure (and if you don’t, that’s genuinely the first and only purchase this guide suggests). Sit in your chair the way you sit when you’re working — feet flat, back against the lumbar, shoulders relaxed and dropped, not braced. Bend your elbows to roughly 90 degrees, forearms parallel to the floor. Have someone measure — or measure yourself against a wall — from the floor to the underside of your elbow. That number, in centimeters, is your target working-surface height.
The reason it’s the elbow and not anything else is mechanical: when your forearms are level and your elbows are at your sides, your shoulders aren’t doing any lifting and your wrists aren’t bending up or down to reach the keys. Everything downstream — wrist angle, shoulder load, the whole upper-body geometry — follows from that one measurement. Get the elbow height right and most of the rest falls into place. Get it wrong and no amount of wrist rest or fancy keyboard rescues it. The step-by-step calculator — seated elbow measurement, desk adjustment or chair raise, and footrest check — is in the desk height calculator guide.
One honest caveat from my own log: “the way you actually sit” is the hard part. People measure themselves sitting up at attention like a soldier, then slump the moment work starts, and now the careful number is wrong. Measure relaxed. Measure twice on two different days. The whole point of a setup log is that you stop trusting a single reading and start trusting a pattern.
Working backward from a fixed desk: the chair-first method
Most people can’t change their desk height — it’s a fixed slab at 74 cm and that’s that. Fine. The geometry still works; you just solve it from the other end. Instead of moving the desk to your elbow, you raise your chair until your elbow lands at the desk surface, and then you fix whatever that breaks below.
The sequence I follow, every time, in this order:
- Raise the chair until your seated elbow height matches the desk surface. The desk is now correct relative to your arms — that’s the priority, because your arms are where you spend the day.
- Check your feet. Raising the chair usually lifts your feet off the floor, or leaves your thighs angled down with pressure under the knees. If your feet dangle, you need a footrest — this is the one accessory the fixed-desk method genuinely forces, and it’s cheap.
- Check your thighs. You want roughly level thighs, or a very slight downward slope from hip to knee, with no hard pressure on the underside of the thigh from the seat edge. If there’s pressure, the seat is too high or the seat pan is too deep for your femur — a chair-fit problem I cover in the chair cluster.
- Re-check the elbow. Footrest in, feet supported, sit the way you’ll actually work, and confirm the forearm is still level at the desk. Log the numbers.
This “chair up, feet supported” approach is why a footrest shows up so often in good fixed-desk setups and why people who skip it end up perching on the edge of the seat. The desk didn’t move; you moved yourself to the desk and then caught what fell out the bottom.
A quick desk-height reference (and why it’s only a starting point)
People always want a table, so here’s one — with the loud caveat that these are starting estimates to sanity-check your own elbow measurement against, not prescriptions. Your forearm length, chair, and keyboard thickness move these numbers. Measure yourself; use the table only to confirm you’re in the right neighborhood.
| Your height | Seated desk height (approx.) | Standing desk height (approx.) |
|---|---|---|
| 160 cm (5’3″) | ~64–66 cm | ~95–98 cm |
| 170 cm (5’7″) | ~67–70 cm | ~101–104 cm |
| 178 cm (5’10”) | ~70–73 cm | ~106–109 cm |
| 185 cm (6’1″) | ~72–75 cm | ~111–114 cm |
| 193 cm (6’4″) | ~75–78 cm | ~116–119 cm |
Notice how the seated numbers cluster around — and below — that “standard” 74 cm. That’s the quiet scandal of fixed desks: the default is roughly right only for tall people, and everyone shorter has been quietly reaching up for years. If you’re under about 178 cm and you’ve never adjusted, there’s a very good chance your desk is too high and you’ve normalized it. The fix for that exact situation gets its own deep dive, because it’s the most common problem I see and the solutions don’t require a new desk.
Above the desk: monitor distance and eye line
Once the surface is at your elbows, the second free fix is the screen. Two numbers: how far away it sits, and how high. Both are pure geometry, both cost nothing, and both get botched constantly because people position a monitor by where the stand happens to put it rather than by where their eyes want it.
Distance. The honest starting point is roughly an arm’s length away — fingertips brushing the screen when you reach — and then adjusted for screen size and text scaling. A small 24-inch panel and a 34-inch ultrawide do not want to sit at the same distance, and the bigger the screen the farther back it generally wants to go so you’re not sweeping your eyes and neck across it. I’ve measured the distances that actually felt right across every panel size on my desk, and that’s a guide of its own because “arm’s length” is a starting gun, not a finish line. The measured distances that felt right across 24-inch through 34-inch panels — adjusted for screen size and text scaling — are in the monitor distance by screen size guide.
Height. The common rule is that the top of the screen sits at or just below your seated eye line, so your natural, relaxed gaze lands in the upper third of the display and you look very slightly down at the rest. Slightly down is comfortable; up is not. Most monitor stands are too short to hit this for most people, which is exactly the case a monitor arm or even a stack of books solves — and getting the eye-line number right is worth its own walkthrough because it interacts with bifocals, laptop screens, and dual-monitor setups in ways a single rule can’t cover.

The laptop problem (and why a riser is non-negotiable)
A laptop is an ergonomic compromise by design: the screen is bolted to the keyboard, so you cannot get both at the right height at once. Put the screen at eye line and the keyboard is up by your chin; put the keyboard at elbow height and you’re staring down at the screen all day. There is no posture trick that solves this, because it’s geometry, not effort.
The only real fix is to separate the two: lift the laptop onto a riser or dock it to an external monitor at eye line, and add an external keyboard and mouse at elbow height. That’s it. Once you’ve split the screen from the keys, a laptop setup follows the exact same rules as a desktop one. The full docking-and-riser case is worth its own article because the “which surface, which height” decision tree has a few wrinkles when you travel or hot-desk.
The setup log: treat your desk like an experiment
Here’s the method that separates a setup that works from one that’s just vibes. Write the numbers down. I keep a setup log — desk height, seated elbow height, monitor distance, monitor top height, monitor tilt, and the standing/sitting ratio I actually sustained that week — and I revise it like any other bench experiment.
Why bother? Because comfort drifts and memory lies. The tape, laser measure and log template I use are listed separately, but a phone note works fine for version one. You’ll lower the desk one centimeter, feel a difference, and a month later have no idea what you changed or whether it helped. Logged numbers let you A/B your own workstation: change one variable, live with it for a few days, and decide with evidence instead of a vague sense. My standing ratio, honestly, sags in the dark months and climbs in spring — the log is what keeps me honest about that instead of pretending I stand four hours a day when I don’t.
This is also the antidote to the entire category of vibes-based gear reviews. A chair “feels great” in a ten-minute showroom sit and is misery by week three because the seat pan is two centimeters too deep for your femur. Numbers catch what showroom minutes hide. Every bench I run gets measured before it gets used — the desk just happens to be the bench I live at.
What the research actually says (and doesn’t)
I want to be careful here, because this is exactly where desk content goes off the rails into health claims. Ergonomics research — the kind summarized by occupational-health bodies — broadly associates neutral working postures and adjustable workstations with lower reported discomfort and fatigue during computer work. That’s a comfort-and-fatigue finding, and it’s the framing I’ll use. Cornell University’s ergonomics group, for instance, publishes well-known guidance on monitor placement and neutral seated geometry that lines up with the elbow-and-eye-line rules above (see Cornell University Ergonomics Web).
What I will not do is tell you a desk height “prevents” anything, “corrects” anything, or “relieves” anything. Those are clinical claims and they’re not mine to make. If you have actual pain, that’s a conversation for a professional, full stop. What I can tell you, from years of measuring my own workstation and others’, is that the geometry in this guide reliably reduces the slow fatigue tax of a long day at the screen — and that it costs nothing to try.
Standing desks: the height numbers change, the method doesn’t
Everything above assumes a seated desk, but the same elbow rule governs a standing desk — your standing elbow height is simply taller than your seated one (look back at the table; the standing column runs 30-odd centimeters above the seated one). The trap with standing desks is people set them by eye, get them slightly too high, and shrug their shoulders all afternoon. The fix is identical: measure your standing elbow height, set the surface there, and confirm the screen is still at eye line standing (it usually needs to come up too). The standing-specific walkthrough covers the gotchas — anti-fatigue mats, the ratio that actually sticks, and why “stand more” is not automatically better. You can see how I’ve configured mine in the measured setup gallery.
Putting it together: the 15-minute dial-in
If you do nothing else after reading this, do this, in order:
- Measure your seated elbow height, relaxed, against a wall.
- Set your desk to that height — or raise your chair to it and add a footrest if your feet dangle.
- Pull the monitor to roughly arm’s length, adjusted for its size.
- Raise the monitor until the top is at or just below your eye line; tilt slightly back.
- If it’s a laptop, lift the screen and add an external keyboard at elbow height.
- Write all five numbers down. That’s your setup log, version one.
Fifteen minutes, zero spending, and you’ve removed most of the daily comfort tax that the people around you are still paying. When you’re ready to spend — a proper standing frame, a chair fitted to your femur, a monitor arm with the right load rating — the rest of this site covers it with the same measure-first skepticism. But the order matters: work through the free geometry first, then buy.
Where to go next
Each of these dives deeper into one number from this guide. Start with whichever one you botched.
- Start Here — the measurement-first doctrine in brief.
- All Desk Geometry Guides — the full library.
- Ergonomics Glossary — elbow height, negative tilt, eye line and the rest, defined.
- Desk Picker — once geometry’s sorted and you’re buying.
- Chair Reviews — dimension-first chair fitting.
- Tools I Actually Use — the tape, the laser, the setup log template.
- Setup Gallery — measured configurations, not staged photos.
- Setups — full workstation breakdowns.
- About the author — why I measure everything.
- Comfort-not-medical disclaimer — the line this site never crosses.
Frequently Asked Questions
What is the correct desk height for me?
The correct desk height equals your seated elbow height: sit relaxed with feet flat and elbows bent to about 90 degrees, then measure from the floor to the underside of your elbow. That centimeter figure is your target working-surface height. Charts based on your total height are only a rough sanity check; your forearm length and chair set the real number.
Is 74 cm a good standard desk height?
About 74 cm is the long-standing furniture default, but it only suits people roughly 178 cm and taller. If you are shorter than that and have never adjusted, your fixed desk is very likely too high and you have simply normalized reaching up to it. Measure your seated elbow height and compare.
How do I fix a desk that is too high without buying a new one?
Raise your chair until your elbows meet the desk surface, then support your feet with a footrest if they no longer reach the floor. This keeps your forearms level (the priority) and solves the downstream foot and thigh issues. It is the most common fix and needs only an inexpensive footrest, not a new desk.
How high should my monitor be?
Position the monitor so the top of the screen sits at or just below your seated eye line, with the display tilted slightly back. Your relaxed gaze then lands in the upper third and you look very slightly down at the rest, which is comfortable. Most stands are too short to reach this, which is what a monitor arm or even a book stack solves.
Can a desk height fix back or neck pain?
This is a comfort-and-geometry guide, not a medical one, so the honest answer is that good desk geometry reliably reduces the fatigue many people report over a long working day, but it is not a treatment for pain or any health condition. If you have actual pain, that is a conversation for a qualified professional.
Related Guides in This Cluster
The full desk-height cluster, in the order most readers follow:
- Desk Height Calculator vs. the Elbow Rule: Which to Trust
- Monitor Distance by Screen Size: How Far Back Each Panel Wants to Sit
- Monitor Height and Eye Line: Where the Top of Your Screen Belongs
- Desk Too High? Four Fixes That Are Not Buying a New Desk
- Laptop Ergonomics: How to Set Up and Dock a Laptop Properly
- Standing Desk Height: Set It Right or It Becomes a Shelf
- Standing Desk Frames: How to Buy the One Part That Matters
- FlexiSpot E7 Wobble Test: The Honest Stability Verdict