
The number that decides whether a monitor arm physically attaches isn’t the weight rating — it’s your monitor arm desk thickness. Clamp arms publish a jaw range, commonly 10–90 mm, and your desktop has to fall inside it with the desk mat counted. Too thin and a hollow top crushes; too thick and the jaw won’t close.
This is the most common reason an arm gets returned, and it’s the easiest to avoid: a tape measure settles it in ten seconds before you buy anything. The catch is that "desk thickness" isn’t just the wood — it’s everything the clamp has to grip through, and there’s a clearance problem underneath that the spec sheet never mentions. Here’s the clamp-and-grommet reality from my own desks.
How to Measure Desk Thickness for a Monitor Arm
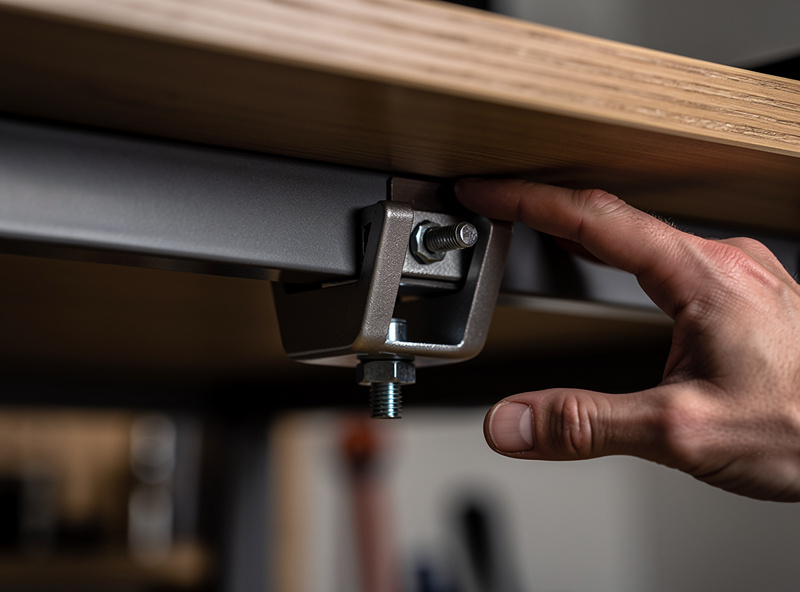
Measure at the exact spot you’ll clamp — the rear edge — and include anything between the jaws: the desktop itself, a desk mat if it runs to the back, and any reinforcing strip. A 25 mm top with a 3 mm mat is a 28 mm clamp target, not 25. Write the number down and check it against the arm’s published minimum and maximum jaw opening.
Then flip the priority: also measure the clearance underneath. The C-clamp’s lower jaw needs room to swing in and tighten, and a rear cable tray, a keyboard drawer, a desk apron, or a back panel can leave you with a top that fits the jaw but no space to actually mount it. I’ve had an arm that fit the thickness perfectly and still couldn’t go on because a 40 mm rear lip blocked the jaw. Measure both dimensions, every time.
One more thing the spec sheet hides: the clamp’s throat depth — how far in from the edge the jaw reaches before the pole. A deep desk lip or a beadboard back can sit inside that throat and stop the clamp seating flush even when thickness and clearance both check out. When in doubt, hold the clamp up to the actual edge and look at whether the pole would stand vertical. It’s a thirty-second dry-fit that beats discovering the problem with the monitor already in your hands.
One number I always write down alongside the thickness is the jaw’s usable range with the mat in place, because the published minimum trips people up as often as the maximum. A clamp rated "10–90 mm" needs a real bite at the bottom end too — on a genuinely thin 16 mm top some clamps barely engage, and the screw bottoms out before the jaw is truly tight. If your target sits within a few millimetres of either published limit, treat it as out of range rather than a near miss; the arm needs to clamp with margin, not just technically reach. In my notes a desk that lands squarely in the middle third of the jaw range is the one I never think about again, the same logic I apply to the weight rating.
Thin and Hollow Desks: The Crush Problem
A clamp concentrates its force on a small area, and a thin hollow-core desktop — the particleboard-over-air construction common on budget desks — can dimple or crack under that pressure within weeks. The top measures fine for the jaw, but it isn’t solid enough to take a point load.
The fix is a spreader plate: a flat metal or thick rubber pad that sits between the clamp and the desk to distribute the force over a wider area. Many arms include one; if yours doesn’t, an aftermarket clamp spreader plate is a few dollars and saves a desktop. On a genuinely flimsy 16 mm hollow top I’d use one even with a light monitor — the dimple shows up slowly, after the return window has closed.
There is a tell for hollow construction before you ever clamp it: tap the top near the rear edge. A solid core sounds dull and dense; a hollow particleboard-over-air top rings slightly and feels lighter than its thickness suggests. That hollow ring is your cue to use a spreader and to keep the load conservative, because the skin doing the work is only a few millimetres thick over a honeycomb or empty cavity. I have flexed the rear edge of a cheap top by hand and watched it visibly bow — that flex is exactly where a clamp will eventually press a permanent dent. A spreader plate plus a panel kept comfortably under the arm’s mid-range is what turns one of these desks from a return risk into a setup that holds for years.
As an Amazon Associate I earn from qualifying purchases.
Clamp vs Grommet: Which Mount for Your Desk
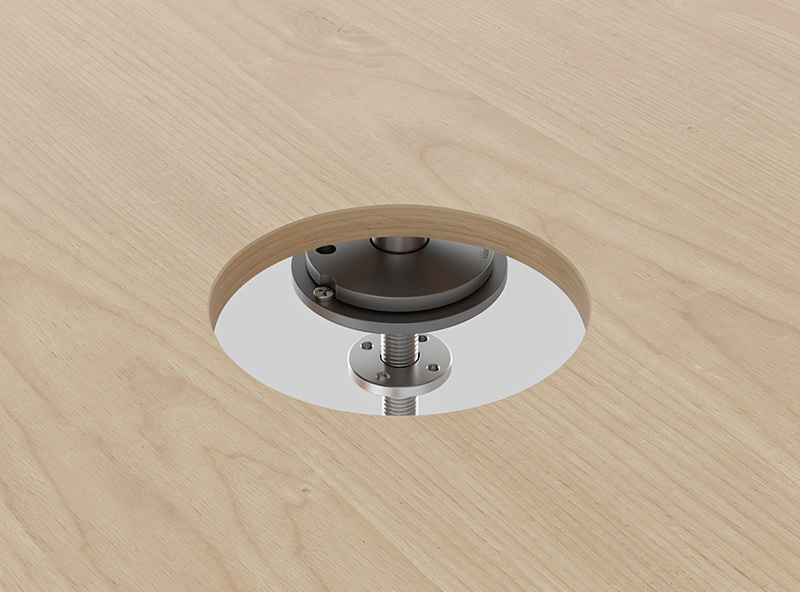
Most arms ship with both mounts. The C-clamp grips the rear edge and needs no modification to the desk; the grommet mount bolts through a drilled hole and ignores thickness limits but means committing a permanent hole. Pick the clamp by default and switch to grommet only when the clamp can’t work.
| Factor | C-clamp mount | Grommet mount |
|---|---|---|
| Desk modification | None — reversible | Drill a hole (permanent) |
| Thickness limit | Bound by jaw range | Handles very thick tops |
| Underside clearance | Needs unobstructed edge | Only needs bolt clearance |
| Thin-desk risk | Can crush — use spreader | Spreads load through hole |
| Best for | Most desks, renters | Thick, lipped, or back-paneled desks |
Go grommet when the desk has a rear lip or apron that blocks the clamp, when the top is thicker than the jaw maximum (a 45 mm solid butcher block past a 40 mm jaw), or when you want the cleanest look with the pole rising straight through the surface. Renters and anyone who reconfigures often should stay with the clamp — it leaves no trace.
If you do go grommet, the drill is the only real commitment. Most grommet bases want a hole around 38–50 mm; a spade bit or a hole saw in that size, plus a backing board to stop the underside tearing out, gets it done cleanly. If your desk has no factory grommet hole, a standalone grommet mount kit lets you place the arm exactly where the geometry wants it rather than where a pre-cut hole happens to be. Measure twice before you drill once — the hole is forever, and an arm placed 10 cm off-center is a daily annoyance.
Glass, Floating, and Odd-Shaped Tops
Glass desks are the genuine problem case: a clamp can crack tempered glass and most grommet routes mean drilling glass, which is a specialist job. For a glass top I’d use a freestanding weighted base or a clamp specifically rated for glass with a thick rubber buffer, and I’d derate the load. Don’t improvise a standard clamp onto glass.
Floating wall-mounted desks often lack underside clearance for a clamp near the wall but are fine at the front edge; a thin metal-frame desk may need a spreader to avoid denting. The principle holds across all of them: measure the thickness with everything counted, confirm underside clearance, and match the mount to what the desk can physically take. The full monitor arm guide ties this to the weight side of the decision, and the weight rating math is the other half of whether an arm fits.
Frequently Asked Questions
How do I measure desk thickness for a monitor arm?
Measure at the rear edge where you will clamp, and include the desk mat and any reinforcing strip between the jaws. A 25 mm top with a 3 mm mat is a 28 mm clamp target. Check it against the arm’s published minimum and maximum jaw opening.
What desk thickness do most monitor arm clamps fit?
Most C-clamps handle roughly 10 to 90 mm, but ranges vary by model. Always check the specific arm’s jaw minimum and maximum. Below the minimum the clamp cannot bite; above the maximum it will not close around the top.
Will a monitor arm clamp damage a thin or hollow desk?
It can. A clamp concentrates force on a small area and a thin hollow-core top can dimple or crack within weeks. Use a spreader plate to distribute the load, especially on a 16 mm hollow desktop, even with a light monitor.
When should I use a grommet mount instead of a clamp?
Use grommet when the desk has a rear lip or apron blocking the clamp, when the top is thicker than the jaw maximum, or for the cleanest look. It means drilling a permanent hole, so renters should stay with the reversible clamp.
Can I clamp a monitor arm to a glass desk?
Not a standard clamp. Tempered glass can crack under clamp pressure, and drilling glass for a grommet is a specialist job. Use a freestanding weighted base or a clamp specifically rated for glass with a thick rubber buffer, and derate the load.