Keyboard and mouse positioning is geometry, not gear. Get three numbers right — keyboard at seated elbow height, wrists straight and roughly flat, mouse parked right beside the keyboard — and your hands stay in a relaxed, low-effort zone for the whole working day. Those fixes cost nothing.
I run my desk the way I run every bench I own: measured first, bought last. Over years of iterating my own workstation I’ve kept a setup log — desk height, elbow height, keyboard tilt, mouse distance, all in centimeters — and the single clearest pattern in it is that the cheap geometry changes outperform the expensive hardware ones almost every time. A split keyboard or a vertical mouse can genuinely help, but only after the free positioning is dialed in. Buy hardware to solve a problem geometry left behind, not to skip the geometry. This guide is the map: the rules that matter, the order to apply them in, and the spokes that go deep on each decision.
The rule that does the most work: keyboard at elbow height
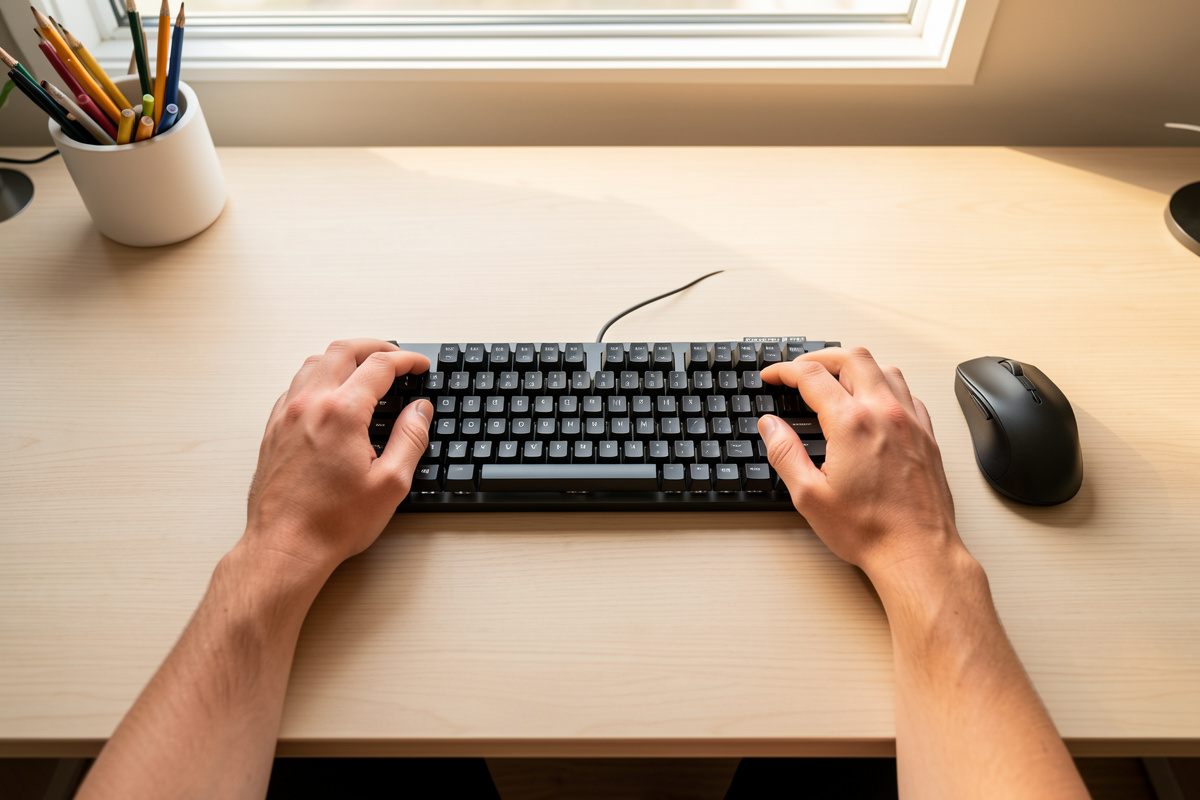
If you change one thing, change keyboard height. The target is simple: when you’re seated with relaxed shoulders and upper arms hanging straight down, your forearms should reach the keyboard roughly parallel to the floor, elbows bent near a right angle. The keyboard sits at the height of your seated elbows — not the desk’s height, your elbows’ height.
That distinction matters because a standard desk is built to a fixed number near 73–75 cm, and that number is the elbow height of a fairly tall person sitting tall. For most people the off-the-shelf desk is a few centimeters too high, which pushes the shoulders up to meet it. In my setup log the difference between a desk set to the elbow rule and a desk left at factory height is only two or three centimeters, but those centimeters are the difference between shoulders that stay down and shoulders that quietly creep toward the ears by mid-afternoon. The full method lives in the keyboard height for typing guide, and the underlying desk math is in the elbow rule vs calculator comparison and the broader desk height guide.
If your desk is fixed and too high, you don’t necessarily buy a new desk — you raise the chair and add a footrest, or you drop the keyboard onto a tray below the desk surface. Those are covered in the desk-too-high fixes, and the tray-versus-desktop decision gets its own treatment below.
Wrist neutrality: flat, straight, and not pivoting
A neutral wrist is comfortable in three directions at once, and most setups break one of them. Flat from the side (no bending up or down), straight from above (the hand lines up with the forearm, not angled out toward the pinky), and level across (not rolled so the thumb climbs). The goal of nearly every input upgrade — wrist rests, tilt changes, split boards, vertical mice — is to protect one of those three planes.
The up-and-down plane is the one people get wrong first, usually by propping the keyboard’s back feet up. Those flip-out feet tilt the keyboard toward you, which cocks the wrists upward — the opposite of neutral. Ergonomics researchers generally report that a flat or slightly negative (tilted away from you) keyboard angle keeps the wrist closer to neutral for most typists. I keep mine flat to slightly negative and the feet folded down; the reasoning and how to achieve a negative angle are in the keyboard tilt and tenting guide.

The straight-from-above plane is what split and tented keyboards address — a standard board forces your hands together and angles the wrists outward to reach the keys, and splitting the halves lets the hands sit at shoulder width pointing straight ahead. The roll plane is what vertical mice and tenting target. None of this is about fixing anything medical; it’s about keeping the joint in the range where holding a position all day takes the least muscular effort, which is what your hands read as comfort.
Where the mouse belongs: close, not out on the savanna
The most common positioning mistake I see isn’t the keyboard at all — it’s the mouse stranded far to the right, out past a full-width keyboard’s number pad, so the whole arm has to abduct (swing away from the body) to reach it. That reach loads the shoulder continuously, and the shoulder is a far bigger muscle group to keep tensed than the wrist. Park the mouse immediately beside the keyboard, at the same height, close enough that your elbow stays near your side when you use it.
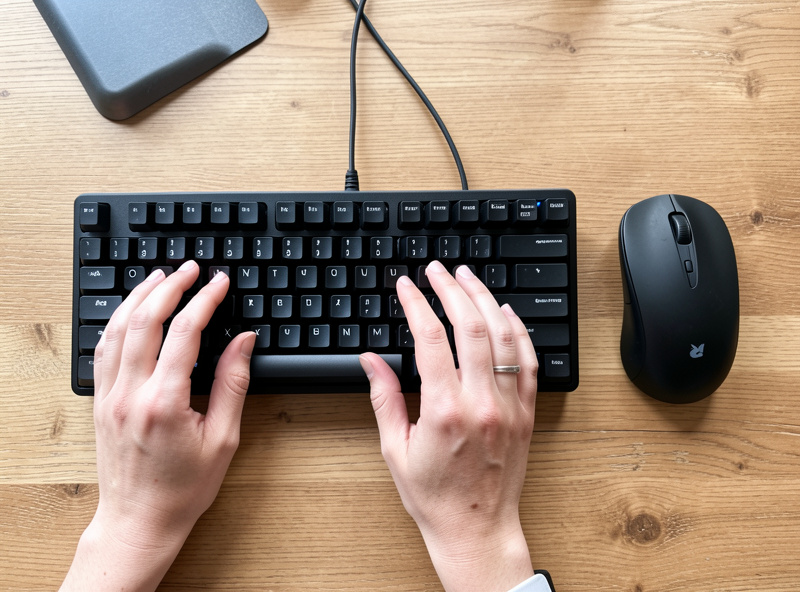
This is the single best argument for a tenkeyless or compact keyboard even if you never type a split: losing the number pad moves the mouse 10–18 cm closer to your centerline, and in my measurements that is the difference between an elbow that rests against the ribs and one that floats out all day. The full reasoning, plus the height-matching and mousing-surface details, is in the mouse position guide for desk work. If the reach is forced on you by a wide board, the fix is the board, not a fancier mouse.
Negative tilt, tenting, and the angle most boards get backwards
Two angle words get confused constantly. Tilt is the front-to-back angle — positive tilt raises the back edge (toward you), negative tilt raises the front edge (away from you). Tenting is the side-to-side angle — raising the inner edges so the keyboard forms a shallow tent and your palms roll inward toward a handshake position rather than lying flat-pronated.
For most people a flat-to-negative tilt and a mild tent are the more neutral combination, and almost no mainstream keyboard ships set up that way — they ship flat with flip-up feet that only add positive tilt. You can fake negative tilt with a wedge or a tray that angles away from you, and full tenting generally requires a split or specifically tented board. The dedicated tilt and tenting guide walks through the angles with numbers; the takeaway here is that the feet on the back of your keyboard are usually working against you, and folding them down is free.
Tray versus on-desk: the height decision under the geometry
All the positioning advice above assumes the keyboard can actually reach elbow height. On a fixed-height desk that’s often impossible while seated — the desk is built tall, so a keyboard on its surface sits above your elbows and lifts your shoulders. You have two honest routes. Raise the chair until your elbows meet the desk, then add a footrest so your feet aren’t dangling — this is the simplest fix and it keeps everything on the desk surface. Or mount an under-desk keyboard tray that drops the board 6–10 cm below the desktop to your seated elbow height, which also gives you an easy place to build in negative tilt.
A sit-stand desk sidesteps the whole problem because you set the surface to your elbow height directly; that’s the entire argument of the standing desk height guide, and if you’re shopping frames the standing desk frame guide covers what actually matters. Laptop users have the worst geometry of all because the keyboard and screen are welded together — the fix there is an external keyboard and mouse so you can separate the two, which is the whole point of the laptop ergonomics guide.
When geometry isn’t enough: the hardware ladder
Once positioning is right and you still feel a specific strain in a specific place, that’s when hardware earns its keep — and only then. The ladder, cheapest and most reversible first: a wrist rest to stop you anchoring your wrists on a hard edge; a compact or split keyboard to fix outward wrist angle and pull the mouse closer; a vertical mouse or trackball to change how the hand and forearm sit. Each of these solves one problem. Buying all four at once usually means you skipped the free fixes and are now paying to paper over them.
A wrist rest is the most misunderstood of the four. It is a place to rest your palms between bursts of typing, not a ledge to plant your wrists on while you type — planted wrists pivot from a fixed point and that’s worse, not better. The honest version is in the wrist rest guide. Split keyboards fix outward wrist angle and let you tent; that’s the split keyboard comfort guide. For the mouse, the two real alternatives are the vertical mouse, which rotates your hand to a handshake grip, and the trackball, which stops the arm moving at all — compared honestly in the vertical mouse comparison and the trackball vs mouse comparison.
The input-comfort upgrades, compared honestly
Here’s how I’d rank the common upgrades by what they actually change, roughly what they cost, and who should bother. Prices are typical street prices and move around; treat them as order-of-magnitude.
| Upgrade | What it fixes | Typical cost | Worth it for |
|---|---|---|---|
| Set keyboard to elbow height | Raised shoulders, high wrist angle | Free | Everyone — do this first |
| Fold the back feet down | Positive tilt cocking wrists up | Free | Everyone with a normal keyboard |
| Compact / tenkeyless keyboard | Mouse stranded too far right | $30–90 | Anyone who rarely uses a number pad |
| Wrist rest (keyboard + mouse) | Wrists anchoring on a hard desk edge | $10–35 | Hard-edge desks; rest between bursts |
| Vertical mouse | Forearm pronation (palm-down roll) | $25–70 | People who feel forearm roll, not wrist |
| Trackball | Whole-arm movement and reach | $30–100 | Tight desks; shoulder reach issues |
| Split / tented keyboard | Outward wrist angle, no tenting | $100–350 | Full-time typists, after the free fixes |
Notice the order: the two free changes sit at the top because in my setup log they moved comfort more than anything I paid for. If you’re going to buy, a compact keyboard and a pair of wrist rests are the highest-value spend, because they fix the two most common geometry faults — the stranded mouse and the anchored wrist — for under fifty dollars. As an Amazon Associate I earn from qualifying purchases. If you want to browse the categories, a tenkeyless keyboard search and a wrist rest search are where I’d start before anything pricier.
How I set mine up: the setup log method
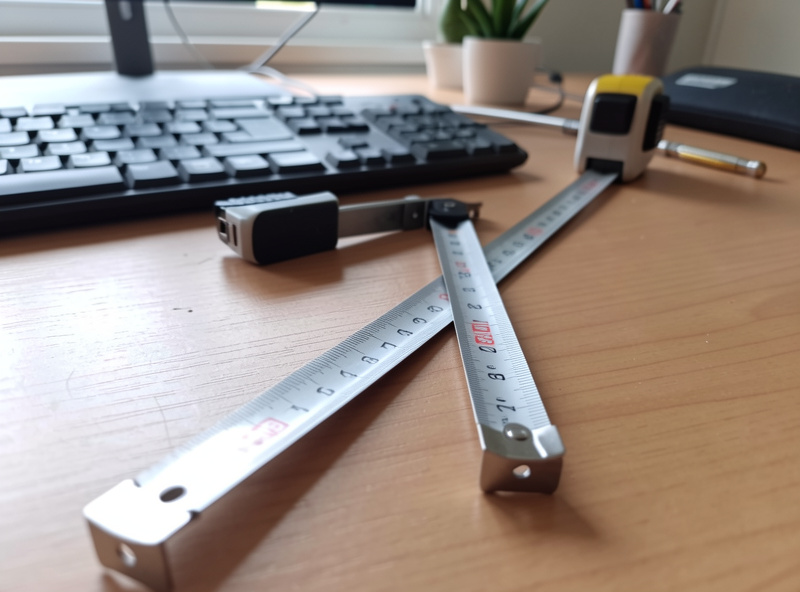
The reason I trust geometry over reviews is that geometry is measurable and a review is a feeling. So I treat the desk like an experiment. I measure my seated elbow height from the floor with the tape — chair set so my feet are flat and thighs level — and that number becomes the keyboard target. I set the desk or tray to it, type for a few days, and note in the log whether my shoulders sit low and whether my wrists stay flat without thinking about it. If something nags, I change one variable, not five, and watch the next few days.
That one-variable discipline is the whole trick. Most people who “can’t get comfortable” changed the chair, the keyboard, the mouse, and the monitor in the same week and now have no idea which one mattered. Change the keyboard height alone first. Then the mouse distance. Then tilt. Then, only if a specific strain remains, a single piece of hardware. Each change gets a few days and a line in the log. It’s slower than buying a “best ergonomic setup” bundle, and it’s the reason my hands are fine at the end of a long Swedish winter spent mostly at this desk.
Geometry connects upward, too: keyboard height is set from the same elbow measurement that sets desk height, and your eye line and monitor height and monitor distance are downstream of where your hands sit, because once the hands are placed the chair and torso are placed, and the head follows. A chair that fits — see the ergonomic chair guide and the seat depth and femur rule — is what lets your elbows land where the keyboard needs them. The workstation is one system; the keyboard is just where your hands enter it.
The order of operations, and why people do it backwards
If there’s a single reason desk setups stay uncomfortable, it’s that the changes get made in the wrong order. The correct sequence is cheapest-and-most-foundational first, because each step changes the one below it. Here’s the order I follow and recommend, every time.
First, set the chair so your feet are flat and your thighs are level — that fixes your seated elbow height, which every other number depends on. Second, set the keyboard (via desk height, a tray, or chair-plus-footrest) to that elbow height. Third, fold the keyboard feet down and check your wrists sit flat. Fourth, pull the mouse in beside the keyboard at the same height. Fifth — and only now — assess whether a specific strain remains, and if it does, add exactly one piece of hardware aimed at it. People who skip to step five and buy a split keyboard while their chair is still wrong end up with an expensive keyboard at the wrong height, which fixes nothing. The hardware can’t compensate for a height error underneath it; it just relocates the error. Do the free, foundational steps in order and most people never reach step five at all.
Reading the signs your positioning is off
You don’t need a goniometer to audit your own setup — you need to notice four tells, all of which are about effort and fatigue rather than anything clinical. Catch any of them and you can trace it straight back to a geometry fault.
The first tell is shoulders that have crept up toward your ears by afternoon; that almost always means the keyboard is too high and you’re lifting to meet it — lower it to elbow height. The second is a mousing arm that floats away from your body; that’s the stranded-mouse problem, fixed by pulling the mouse in or going compact. The third is the urge to rest your wrists on the hard front edge of the desk while typing; that’s a sign the keyboard wants to be lower or flatter, and a wrist rest is a stopgap, not the cure. The fourth is a forearm that feels rolled or tight on the outside; that points at pronation, the thing a vertical mouse or a tented keyboard addresses. None of these are diagnoses — they’re fatigue signals, the body’s way of saying a position costs more effort than it should. Treat each as a pointer back to a specific free fix before you treat it as a reason to buy. In my setup log, every time I chased one of these signals back to its geometry cause, the fix was a measurement, not a purchase.
Comfort, not medicine: the honest line
Everything here is about comfort, fatigue, and the muscular effort of holding a position — not about treating, preventing, or curing anything. If you have pain, numbness, or a persistent problem, that’s a question for a physiotherapist or doctor, not a desk blog, and no keyboard angle is a substitute for medical advice. What good positioning reliably does is lower the constant low-grade effort of keeping your hands in a working position, so the end of the day feels less like the start of one. That’s the claim I’ll stand behind, because it’s the one my setup log actually supports.
Related Guides
- Keyboard Height for Typing Comfort
- Mouse Position Guide for Desk Work
- Wrist Rest for Your Keyboard: An Honest Guide
- Split Keyboard for Arm Comfort
- Vertical Mouse Comparison Guide
- Trackball vs Mouse: The Ergonomic Comparison
- Keyboard Tilt and Tenting Angles
What is the most important thing in keyboard and mouse positioning?
Keyboard height. Set it to your seated elbow height so your forearms reach the keys roughly parallel to the floor with relaxed, low shoulders. This single free change does more for all-day comfort than any hardware purchase, and it has to be right before other upgrades help.
How close should my mouse be to my keyboard?
Right beside it, at the same height, close enough that your elbow stays near your side. A mouse stranded out past a full number pad forces the whole arm to swing away from the body, which loads the shoulder all day. A compact keyboard moves the mouse 10 to 18 cm closer.
Should I use the flip-out feet on the back of my keyboard?
Usually no. Those feet add positive tilt, raising the back edge toward you, which cocks the wrists upward away from neutral. A flat or slightly negative angle keeps the wrist closer to neutral for most typists, so folding the feet down is a free improvement.
Do I need a split keyboard or a vertical mouse?
Only after the free geometry fixes. Set keyboard height, fold the feet, and pull the mouse close first. If a specific strain remains, a split keyboard fixes outward wrist angle and a vertical mouse fixes forearm roll. Buying hardware before fixing positioning usually papers over the real problem.
Is a wrist rest good or bad for typing?
It depends how you use it. A wrist rest is a place to rest your palms between bursts of typing, not a ledge to plant your wrists on while you type. Planted wrists pivot from a fixed point, which is worse. Used as a between-bursts rest on a hard-edged desk, it helps.
Can good keyboard positioning prevent injury?
This is a comfort and fatigue question, not a medical one. Good positioning lowers the constant muscular effort of holding your hands in a working position, so the day feels less tiring. If you have pain or numbness, see a physiotherapist or doctor; no desk setup is a substitute for medical advice.