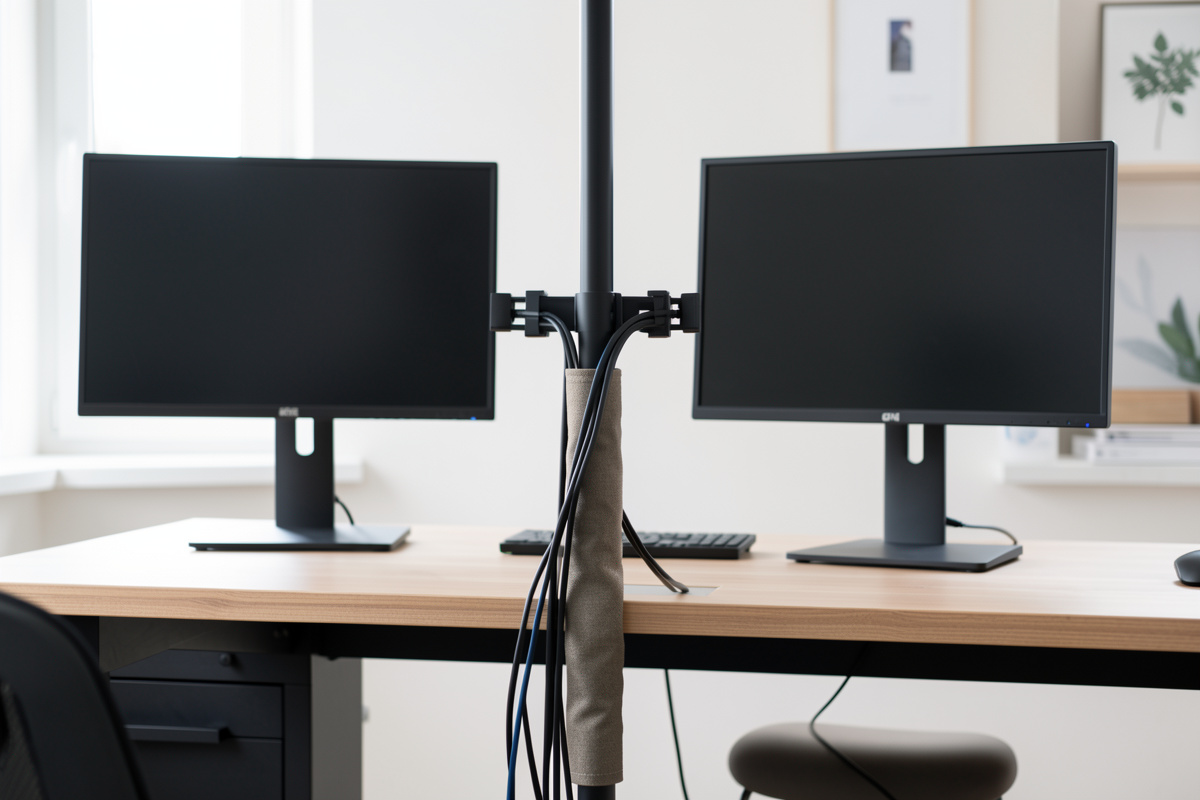
The trick to cabling dual monitor arms is to route for movement, not for a static position. Leave a service loop of slack — I aim for 10-15 cm at each joint — run the bundle down the center pole or along the arm’s built-in channel, and anchor it only once it reaches the desk — never tight to a panel that moves. Two arms double the cable count exactly where it shows, and the first time you raise a screen, a cable routed tight will either yank or pop its clip. Build slack into the path and the arms stay free.
I route my own arm cables this way because a cable that fights the arm slowly drags a panel out of the height and angle I measured. This guide covers the service-loop method, what to anchor where, the velcro-versus-zip-tie question for moving joints, and how to tidy the bundle once it is under the desk. It is a practical wiring method — about keeping a moving setup clean and stable, nothing more.
Why Moving Arms Change the Cable Problem
A monitor on a fixed stand has a cable run that never changes, so you can pull it tight and forget it. A monitor on an arm moves — up, down, forward, back, and often a swivel — and every one of those motions changes the distance the cable has to span. If you cabled it tight at one position, raising the panel stretches the cable until it either tugs the connector or pops out of whatever clip held it. Two arms means two panels doing this independently, plus the doubled power and USB runs, all converging near the mount.
So the whole method is built around giving the cable enough slack to follow the arm through its full range without ever going taut. That slack is the service loop, and where you place it is what separates a clean moving setup from a cable that fights you. The arms themselves and their mounting are covered in the dual monitor arm comparison, and the broader build is the dual monitor setup guide.
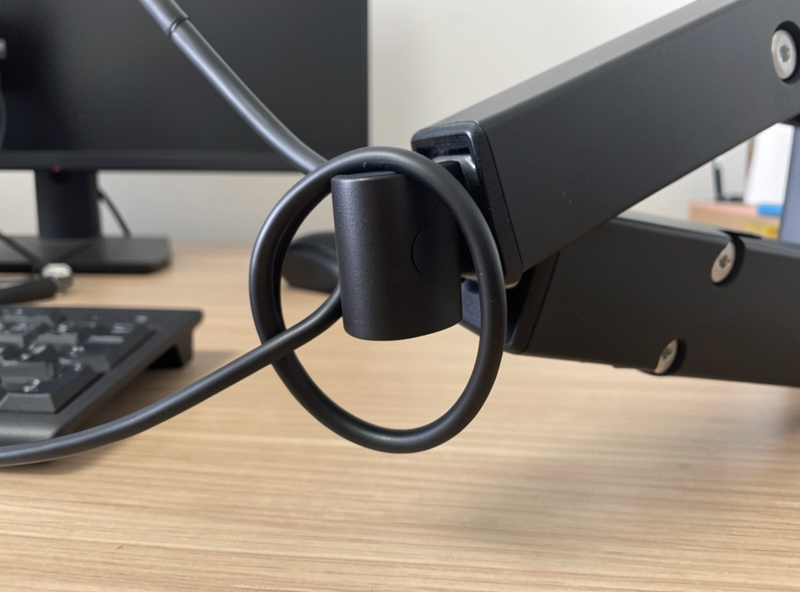
Service Loops: Slack Where the Arm Bends
A service loop is a deliberate loop of extra cable left at each point where the arm articulates. At the joint nearest the panel, leave enough slack that when you raise the screen to its highest position, the loop simply straightens rather than the whole cable going tight. Do the same at the main pivot. The loop should be loose enough to move but not so big it dangles into view. Test it by running the arm through its full travel — fully up, fully forward, swivelled — and watch that no cable ever pulls taut or lifts its anchor.
This is the single step most people skip, and it is why their arm setup looks tidy at one height and a mess at another. Size the loops with the arms in their working position, the same way you size everything else once the geometry is set. If you rotate a panel to portrait, that motion needs its own slack too — check it specifically, because the swivel-to-vertical move pulls more cable than a simple height change.
Anchor at the Desk, Not at the Panel
The rule for anchoring is simple: the cable should be free to move with the arm above the desk, and only fixed down once it reaches the static part of the setup. Run each panel’s bundle along the arm — most quality arms have a clip-on channel or an internal raceway for exactly this — down to the mount, then to the desk. The first hard anchor point is at the desk surface or the rear edge, where nothing moves. From there it can be as tidy and tight as you like.
What you must not do is clamp the cable to the desk right at the base of a moving arm with no slack above it, or zip-tie it to the arm so tightly that a joint cannot move. Both turn the cable into a leash. If your desk has a grommet hole, that is the natural pass-through point to drop the bundle below — and the grommet is also where a clamp-or-grommet arm mount lives, covered in the monitor arm desk thickness guide. No grommet? Run the bundle to the rear edge and down.
| Zone | What goes here | How to secure it |
|---|---|---|
| At the arm joints | Service loops of slack | Loose velcro, or nothing |
| Along the arm | Bundle in channel/raceway | Arm’s built-in clips |
| At the desk edge / grommet | First hard anchor | Velcro or a clip — firm |
| Under the desk | Power strip, excess slack | Tray, sleeve, tight ties |
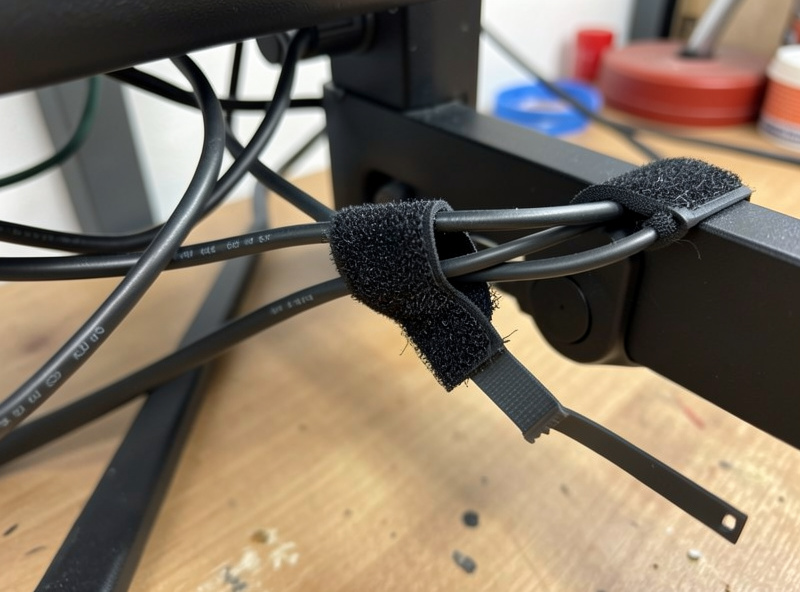
Velcro vs Zip Ties on a Moving Setup
For arm cabling, reusable velcro straps beat zip ties almost everywhere, because you will re-route every time you change a panel or add a device, and a velcro strap loosens in a second where a zip tie needs cutting. More importantly, velcro lets you leave a join slightly loose so a joint can still move, while an over-tight zip tie at the wrong spot locks a cable to the arm and stops it travelling. Save the zip ties for the static under-desk zone, where things never move and you want a permanent tidy bundle.
A fabric cable sleeve is the other useful piece: it wraps the doubled bundle from two panels into one clean run down to the desk, which both looks tidier and keeps the cables moving together as a unit. A cable management sleeve plus a pack of reusable velcro ties handles the visible part of almost any dual-arm setup. As an Amazon Associate I earn from qualifying purchases.
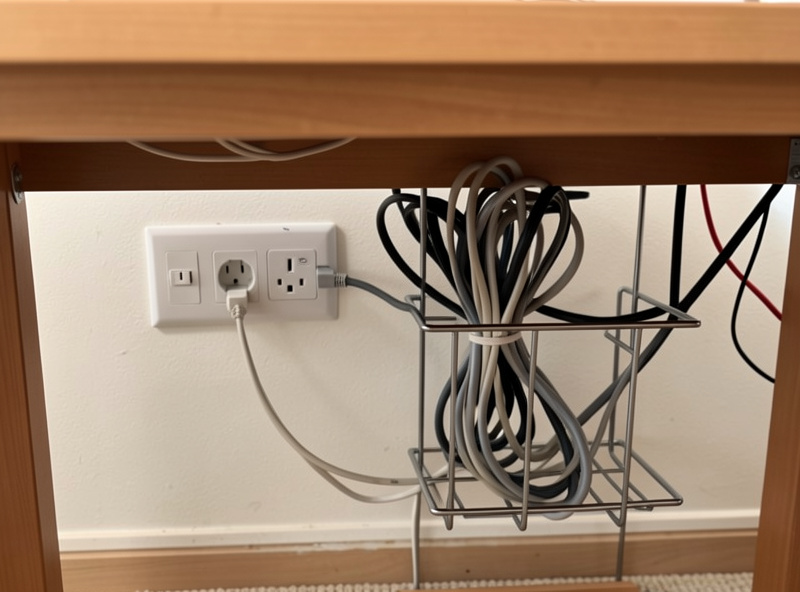
Taming the Under-Desk Zone
Below the desk is where the doubled cable count, the power strip, and any dock or hub live, and it is the one zone where you can be as tight and permanent as you want because nothing moves. Mount the power strip to the underside or a leg rather than leaving it on the floor, coil and tie off excess length, and consider an under-desk tray or raceway to carry the whole bundle across to wherever it drops to the wall. The goal is that the only cables crossing the open floor are the few that have to reach the wall, and even those run together.
Getting this zone right matters more on a sit-stand desk, where the whole surface travels and the under-desk run has to tolerate the desk’s full height change — a service loop applies to the desk itself, not just the arms. The principle is the same throughout: slack where things move, tight where they do not. With the arms cabled for movement and the under-desk zone locked down, your two screens can travel through their full range without a single cable fighting the geometry you set in the dual monitor height and angle guide.
Frequently Asked Questions
How do I manage cables on a monitor arm?
Route for movement, not a fixed position. Leave a service loop of slack at each arm joint, run the bundle along the arm’s channel or center pole, and anchor it only at the desk where nothing moves. Test by running the arm through its full range and checking no cable goes taut.
What is a service loop and why does it matter?
A service loop is a deliberate loop of extra cable left at each point the arm bends. When you raise or swivel the panel, the loop straightens instead of the whole cable pulling tight and tugging the connector. Size the loops with the arm in its working position.
Should I use zip ties or velcro on a monitor arm?
Use reusable velcro on the moving parts, because you will re-route when you change panels and velcro lets a joint stay loose enough to move. Save zip ties for the static under-desk zone. An over-tight zip tie on the arm itself can lock a joint and stop it travelling.
Where should I anchor monitor arm cables?
Keep the cable free to move with the arm above the desk, and make the first hard anchor at the desk surface, rear edge, or grommet hole where nothing moves. Never clamp the cable tight at the base of a moving arm with no slack above it, which turns it into a leash.
How do I hide the cables from two monitors?
Wrap the doubled bundle from both panels in a fabric cable sleeve down to the desk, drop it through a grommet or over the rear edge, then manage the under-desk zone with a tray and a mounted power strip. Only the few cables that must reach the wall cross the floor.