A monitor arm is worth buying when you can name the number it has to hold and the desk it has to clamp to — not before. The honest monitor arm guide starts with two measurements: your monitor’s VESA weight in kilograms and your desktop’s thickness in millimeters. Get those two right and a $35 arm and a $200 arm both work; get them wrong and the premium one sags or won’t clamp either.
I run my whole workstation as a measurement experiment, and the monitor arm is the part people overspend on for the wrong reasons. After years of clamping, re-clamping, torquing gas springs and logging how each one drifted, my verdict is simple: an arm is a load problem and a desk-mounting problem wearing a marketing budget. This guide is the geometry and the math — the free decisions that decide whether any arm you buy will actually float your screen where your eye line wants it, or just become an expensive desk ornament.
What a Monitor Arm Actually Does (and Doesn’t)
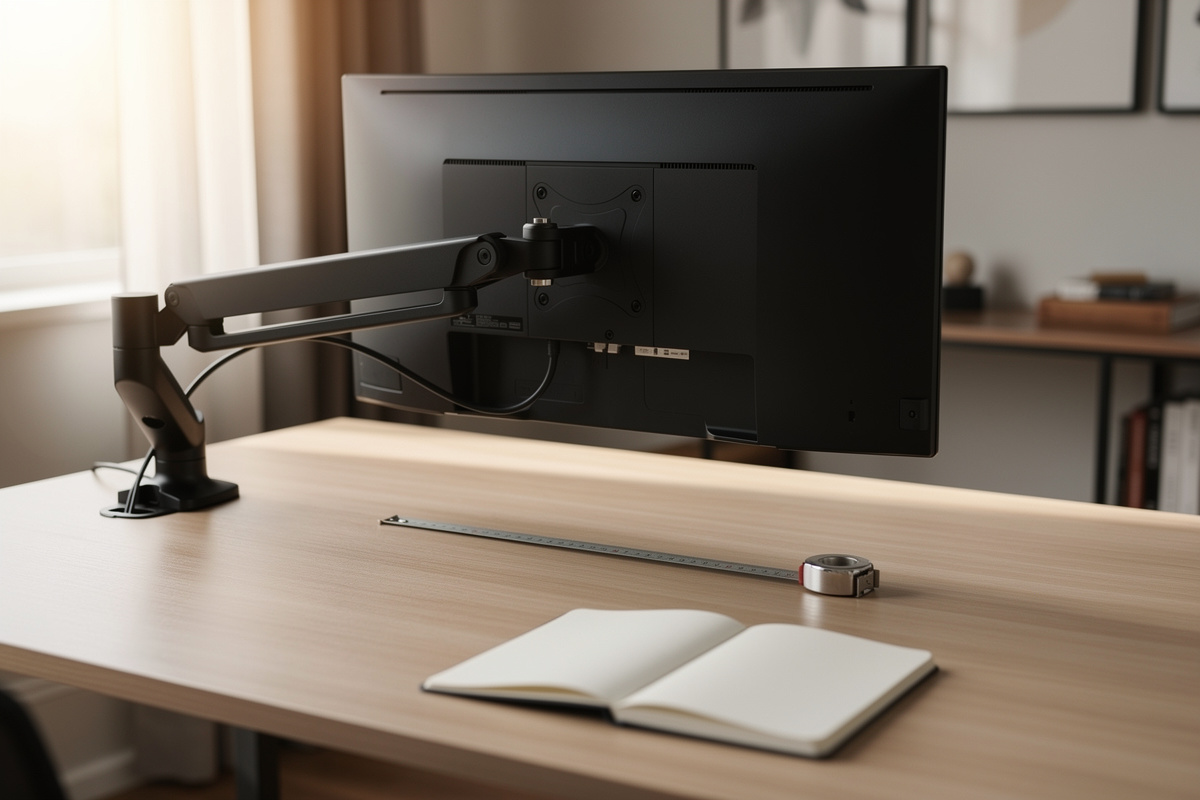
A monitor arm holds your display in mid-air on a clamp or grommet base and a tensioned mechanism, freeing the desk depth a stock stand eats and letting you set height, distance, and tilt independently. That last part — independent geometry — is the real value, not the floating look.
The stock stand that ships with a monitor sets one height (usually too low) and parks the panel 8–15 cm forward of the desk’s rear edge, stealing depth you need for keyboard distance. An arm reclaims that depth and lets you push the screen back to a proper monitor distance, which is the whole point of getting your screen distance by panel size right. What an arm does not do is fix a screen that’s the wrong size for your desk or a desk that’s the wrong height — those are separate problems, and I cover the height side in my desk height guide. The arm is a positioning tool. It moves a correctly-chosen screen to a correctly-calculated spot. If the spot is wrong, see monitor distance by screen size first.
The Two Numbers That Decide Everything
Before any brand comparison, you need exactly two numbers: your monitor’s actual weight (head only, no stand) and your desktop’s thickness at the spot you’ll mount. Every arm on the market publishes a weight range and a clamp range; if your two numbers fall inside both, the arm fits. If either falls outside, no amount of build quality saves it.
Monitor weight lives on the spec sheet as "weight without stand" — a 27-inch IPS panel is typically 4–6 kg, a 34-inch ultrawide 6–9 kg, a 42-inch big-format display 10 kg and up. Desk thickness matters because clamp arms publish a maximum jaw opening, commonly 60–90 mm, and a minimum below which the clamp can’t bite. Measure both with a tape, write them in a note, and carry them into every product page. The weight-rating math has more nuance than the headline number suggests — arms are rated for a range, not a single max, because the gas spring has to counterbalance whatever is on it, and the safe working load sits well below the printed maximum. I unpack exactly how to read that range in my monitor arm weight rating breakdown, because the headline kilogram figure is the one number manufacturers round most optimistically.
Don’t trust the panel’s box weight or a retailer’s rounded figure. Pull the manufacturer spec sheet and find the line that explicitly excludes the stand, because the bundled stand can add a kilogram or more that has nothing to do with what the arm carries. If your monitor isn’t listed cleanly, weigh the head on a kitchen scale — head only, VESA plate exposed. That five-minute weigh-in is the single most useful number in the whole purchase, and it’s the one almost nobody actually measures. Once you have it, you’ll find a lot of arms that "should" work are rated with the load sitting at the top of their range, which is exactly where the counterbalance feels stiffest and the joints loosen soonest.
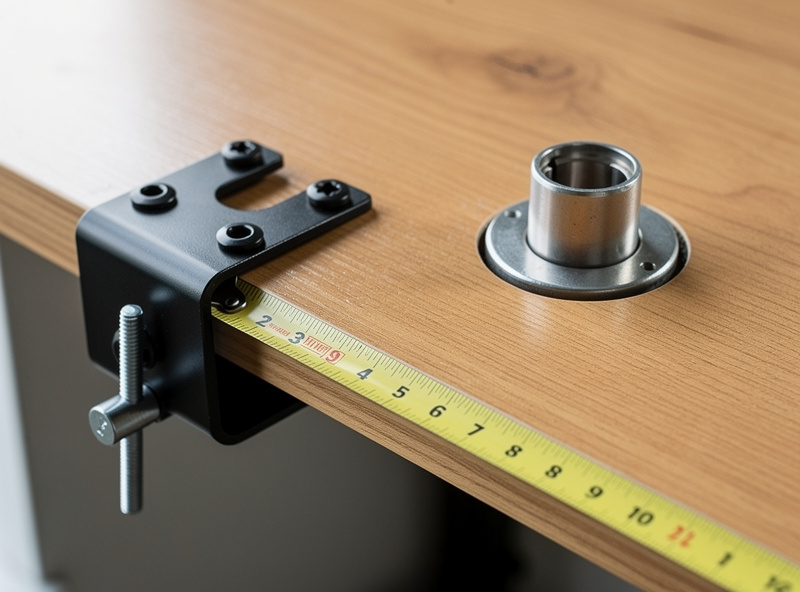
Clamp vs Grommet: How Arms Attach to a Desk
Most arms ship with both a C-clamp and a grommet mount in the box. The C-clamp grips the desk’s rear edge from above and below and needs unobstructed access to the underside; the grommet mount bolts through a drilled hole. Pick the clamp unless your desk has a lip, a back panel, or a rear apron that blocks the jaw — then you’re either drilling a grommet hole or rethinking the spot.
The reality nobody warns you about: thin desktops flex and thick ones exceed the jaw. A 16 mm IKEA-style hollow-core top can dimple or crush under clamp pressure unless you add a spreader plate, and a 40 mm solid butcher block can blow past a 60 mm jaw once you account for a desk mat and the clamp geometry. Measure the thickness including anything between the jaws. The grommet-and-clamp details decide whether the arm physically attaches at all — it’s the most common return reason I’ve logged, and I cover the thin-top spreader-plate fix and the underside-clearance check in full in my monitor arm desk thickness and clamp guide.
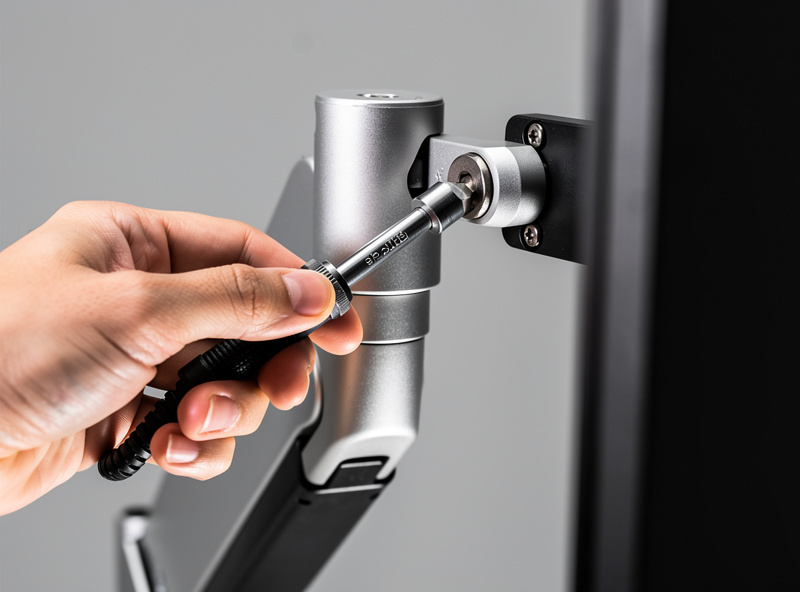
Gas Spring vs Mechanical Spring: Which Mechanism
Two mechanisms dominate: gas-spring (a sealed pneumatic cylinder) and mechanical-spring (a coiled steel spring). Gas springs move smoother, hold a wider weight range per arm, and adjust with a single tension screw; mechanical springs cost less and are effectively immune to the slow pressure loss that gives cheap gas arms a bad name. For most desks I’d take a gas spring and tension it properly.
The complaint you’ll read everywhere is that gas-spring arms "drift" — the monitor slowly sinks or rises overnight. In my logs, true mechanical drift on a quality arm over months is small; most "drift" is a tension screw that was never matched to the actual monitor weight in the first place. A 4 kg panel on an arm tensioned at the factory for a 7 kg load will creep upward; the same arm dialed to 4 kg holds. The fix is the screw, not a new arm — though genuine seal failure does exist on the cheapest cylinders. I walk through the five-minute tension correction, and how to tell true seal failure from a mis-set screw, in my guide to fixing monitor arm gas spring drift.
There’s a temperature wrinkle worth knowing if your desk sits by a cold window, as mine does through a Swedish winter. A gas cylinder’s internal pressure drops slightly as it cools, so an arm dialed in at a warm afternoon temperature can sit a touch lower on a cold morning until the room and the cylinder warm up. It’s small and it’s reversible — not a fault, just physics — but it’s worth re-checking your tension once after the seasons change rather than chasing a screw setting that was fine all along. Mechanical-spring arms don’t show this at all, which is one quiet reason they keep selling despite the rougher motion.
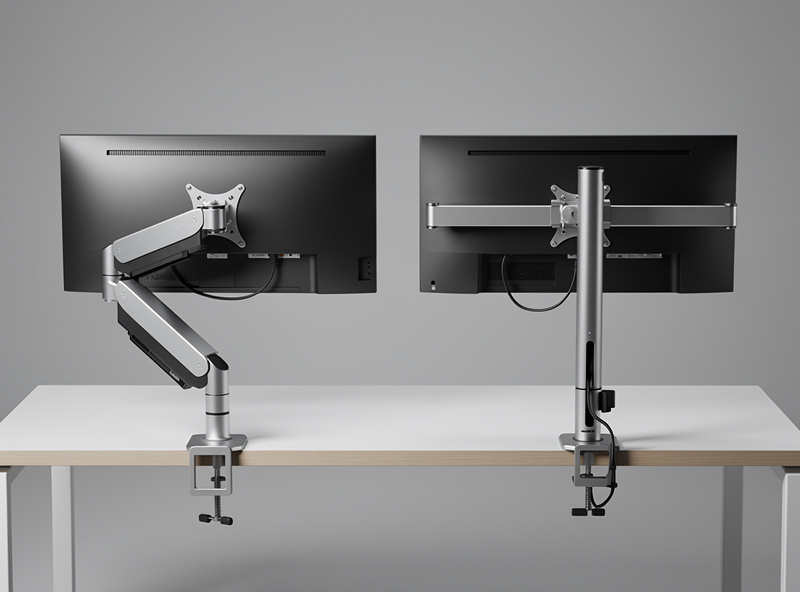
Single, Dual, or Ultrawide: Match the Arm to the Array
The arm style follows the screen count and size. One screen wants a single arm. Two screens of equal size can go on a dual crossbar arm or on two independent single arms — and that choice is less obvious than it looks. A wide or curved ultrawide (34-inch and up) needs an arm rated for both the higher weight and the longer lever the panel’s width creates.
A dual crossbar shares one clamp and one pole, saving a clamp point and money, but it locks your two screens into a paired height and a shared pivot — great for matched panels, frustrating if you want one screen portrait and one landscape. Two single arms cost more and need two clamp points but give each screen full independence. The full decision — one shared crossbar versus two separate arms, including the clamp-spacing math two arms demand — is in my dual monitor arm vs two single arms comparison. For ultrawides the trap is leverage: a 34-inch panel might weigh only 7 kg but its width multiplies the torque on the arm’s joints, so an arm rated "up to 9 kg" for a 27-inch can wobble under a lighter-but-wider ultrawide. Read the manufacturer’s screen-size rating, not just the weight — I spell out the weight-plus-width numbers a curved ultrawide actually demands in my ultrawide monitor arm requirements guide.
What Each Price Tier Actually Buys You
Across the tiers I’ve mounted, the price buys mechanism quality, weight range, and finish — not whether your screen floats. A sub-$40 arm holds a single light panel fine if its ranges fit; the $150–$250 tier (Ergotron-class) buys a wider counterbalance range, smoother motion, and joints that don’t loosen. The table below is the honest spread.
| Tier | Typical price | Mechanism | Weight range | Best for |
|---|---|---|---|---|
| Budget single | $25–$45 | Gas spring (basic) | 2–8 kg stated, ~6 kg real | One light 24–27″ panel on a fitting desk |
| Mid single | $60–$110 | Gas spring | 2–9 kg | 27″ or a light 34″ ultrawide |
| Premium single | $150–$250 | Constant-force gas | 1–10 kg, fine tension | Heavy panels, daily reposition, decades of use |
| Dual crossbar | $70–$160 | Gas spring | 2×8 kg typical | Two matched screens, paired height OK |
| Heavy / ultrawide | $120–$300 | Reinforced gas | up to 15–20 kg | 42″+ or wide curved ultrawides |
The lesson from my setup log: the cheap arm fails by being out of range, not by being cheap. If your two numbers fit a budget arm’s ranges and you won’t reposition it ten times a day, it’ll hold for years. The premium tier earns its money on heavy loads, frequent movement, and finish — not on basic float.
VESA Mounting: The Compatibility Check Before You Buy
Every arm attaches to the monitor through a VESA plate — a square bolt pattern on the back of the panel, almost always 75×75 mm or 100×100 mm. Before buying any arm, confirm your monitor has a VESA pattern at all and which size, because a surprising number of consumer monitors ship with no VESA holes and a permanently-attached stand.
If your monitor lacks VESA holes, you’re not out of luck, but you do need a VESA adapter bracket made for that model family — a plate that grips the panel’s existing stand mount or clamps the chassis. These are model-specific and fiddly; I’d verify one exists for your exact monitor before committing to the arm. Most arms include a 75/100 mm adapter in the box, so once your panel has a compatible pattern the rest is four screws. Get the VESA question answered first, the weight and thickness numbers second, and the brand decision dead last — that order is the entire buying method, and it’s the same dimension-first logic behind reading the right distance for your panel size.
Setting the Arm So Your Eye Line Is Right
Mounting the arm is half the job; positioning the screen is the other half. Set the top of the screen at or just below eye line when you sit upright, push the panel back to the distance your screen size wants (roughly an arm’s length for a 27-inch), and add a slight backward tilt of 10–20 degrees so you look at the panel, not up at it.
Negative tilt matters more than people think for a tall panel: angling the top edge slightly away from you keeps your eye line square to the upper third of the screen, where toolbars and tabs live. This is where the arm pays off: it lets you set height, distance, and tilt as three independent dials instead of the one fixed compromise a stock stand gives you. If you’ve ever fought a screen that was simply mounted too high to begin with, the arm is the tool that fixes it without the book-stack hacks I describe for a desk that’s too high. Dial it against your own measured eye line — the method is in monitor height and eye line — and re-check it after a week, because the "right" spot shifts once your chair and desk height are also dialed in. If you work off a laptop, the arm plus a dock changes the whole geometry; I cover that in the laptop ergonomics setup.
Cable Routing and the Detail That Makes It Look Clean
The visual payoff of an arm is a desk with nothing draped behind the monitor, and that depends entirely on the cable channel. Better arms route the display cable and power through clips or a channel along the arm itself, so the only run you see is the short drop from the desk edge to under-desk management. Budget arms often skip the channel and you end up zip-tying cables along the pole.
Plan the slack before you mount. A monitor on an arm moves — up, down, forward, back — and the cable has to follow without going taut at the extremes or pooling in a loop at rest. I measure the full travel of the arm, add about 15 cm of slack, and route from the panel’s worst-case far position back to the desk grommet. Then the cable spine under the desk takes it the rest of the way. Get the slack wrong and the cable either yanks the connector at full extension or sags into view; this is the same cable-slack logic that bites people on a height-adjustable standing desk frame, where the run has to survive the full sit-to-stand travel.
Do You Even Need a Monitor Arm?
Not every setup needs one, and I won’t pretend otherwise. If your monitor’s stock stand already places the top of the screen at eye line, sits at a comfortable distance, and you never move the panel, an arm changes nothing about your geometry — it just buys back desk depth and a cleaner look. That’s a real benefit, but it’s a want, not a fix. I lay out the whole keep-it-or-ditch-it test — the cases where the stock stand genuinely wins — in monitor arm vs monitor stand.
You need an arm when the stock stand can’t reach your correct geometry: the screen won’t go high enough, won’t push back far enough, or eats depth you need for keyboard distance. You also need one for any multi-monitor array where stock stands collide, and for wall-or-pole desk-edge mounting in tight spaces. My rule from the setup log: solve the free geometry first — height, distance, tilt with whatever stand you have — and only buy an arm if the stand physically can’t get you there — the same logic I apply to picking a chair by dimension rather than by review score. Spending $200 to float a screen that was already in the right place is furniture, not ergonomics.
Common Mounting Mistakes I See Over and Over
The mistakes are consistent and all preventable with a tape measure. The expensive one is buying on brand reputation without checking that your weight and thickness numbers fall inside the arm’s ranges — a premium arm that’s out of range performs worse than a budget arm that fits.
The second is clamping a thin hollow-core desktop without a spreader plate and finding a permanent dimple weeks later. The third is never touching the tension screw, then returning a perfectly good arm because it "drifts." The fourth is forgetting that the clamp needs clearance under the desk — a rear cable tray, a drawer, or a back panel can leave you with an arm that physically won’t bite where you wanted it. Measure the underside clearance too, not just the top thickness. Every one of these is a five-minute check that saves a return.
Frequently Asked Questions
How do I know if a monitor arm will hold my screen?
Check two numbers against the arm’s spec: your monitor’s weight without its stand (on the spec sheet) and your desktop thickness. If both fall inside the arm’s stated weight range and clamp jaw range, it fits. Most 27-inch panels weigh 4 to 6 kg.
Why does my monitor arm slowly sink or rise?
Almost always the tension screw was never matched to your actual monitor weight. An arm set for a 7 kg load will creep up under a 4 kg panel. Adjust the tension screw to your weight before assuming the gas spring has failed.
Clamp or grommet mount: which should I use?
Use the C-clamp unless your desk has a rear lip, back panel, or apron blocking the jaw, or your top is thicker than the clamp’s maximum opening. Grommet mounts bolt through a drilled hole and suit thick or obstructed desks.
Will a monitor arm damage a thin or hollow desk?
A 16 mm hollow-core top can dimple under clamp pressure. Add the included or aftermarket spreader plate to distribute the load, and measure the thickness including any desk mat between the jaws before buying.
Do I need an arm rated higher for an ultrawide monitor?
Yes. A wide panel multiplies the torque on the arm’s joints, so an arm rated for a 27-inch at 9 kg can wobble under a lighter but wider 34-inch ultrawide. Read the manufacturer’s screen-size rating, not just the weight figure.
Is an expensive monitor arm worth it?
Only if you load it heavily, reposition often, or want decades of smooth use. For one light panel on a desk that fits, a 35 to 45 dollar arm holds for years. Premium arms earn their price on heavy loads and frequent movement, not basic float.