Good desk lighting is three light sources doing three different jobs: a task light for your hands and paper, a bias light behind the screen to soften contrast, and ambient room light so the screen is not the only bright object in a dark room — for most desks that means roughly 450–500 lux of task light layered over a dimmer ambient glow. Get those three right and most “my eyes feel cooked by 4pm” complaints disappear. In my setup log the single biggest comfort change over a Swedish winter was not a new monitor — it was adding light behind it and dropping the overhead glare.
I build every workstation I own and I measure all of it, so I treat lighting the way I treat desk height: a geometry problem first, a shopping problem second. This guide is the map. It covers where light should come from relative to your eye line and your screen, how many lumens and what color temperature a desk actually needs, and which fixtures — monitor light bars, desk lamps, bias strips, smart bulbs — earn their place. Each section links to a deeper spoke if you want the full measurement.
The three layers of desk lighting (and why one fixture never does it)
A desk needs layered light: ambient (the room), task (your work surface), and bias (behind the screen). Relying on one source is where comfort breaks down. A single overhead fixture throws light onto your screen and creates reflections; a single bright lamp in a dark room makes your pupils fight the gap between a glowing screen and black surroundings. Layering spreads the brightness out so your eyes are not constantly re-adjusting.
Here is the way I think about each layer at my own desk. Ambient light sets the room baseline — you want the wall behind the monitor to read as gently lit, not black. Task light is a directed pool for anything physical: notes, a keyboard in a dim room, a sketchpad. Bias light is the thin strip of glow directly behind the monitor that closes the contrast gap between the screen and the wall. The screen itself is technically a fourth light source, and its brightness should roughly match the brightness of the wall around it — that match is the whole game for eye comfort at night.
Geometry first: where light comes from matters more than how much
The cheapest lighting fix costs nothing: move the light source so it is never in front of you and never reflecting off the screen. Light that comes from above and behind the screen plane — or from the side at desk level — lands on your work without bouncing into your eyes. Light from a window or lamp behind your monitor (facing you) is the worst case, because it forces your pupils to stop down while you read a comparatively dim screen.
I keep three geometry rules in my setup log. First, no bare bulb or bright window in your direct field of view while you face the screen — that is the glare you actually feel. Second, a desk lamp belongs to the side, angled so its cone hits the desk and not the monitor’s face; if you wear glasses, raise it higher and steepen the angle so it clears the lenses. Third, the monitor should sit perpendicular to a window, not facing it or backing onto it. These are the same eye-line and distance principles I use when I set monitor height and monitor distance by screen size — lighting is just the same geometry extended off the desk and onto the walls. If a window is the problem, the fix is often a shade plus repositioning, which I cover in the monitor glare guide.
Lumens and color temperature: the two numbers on the box
For a desk, aim for roughly 450–500 lux on the work surface for general computer work, climbing toward 750–1,000 lux for fine detail work like reading small print or handwork — figures broadly consistent with what lighting bodies such as the Illuminating Engineering Society publish for office tasks. Lumens are the bulb’s total output; lux is what actually lands on your desk, and it falls off fast with distance, which is why a 1,000-lumen lamp 80 cm away can underperform a 400-lumen lamp parked close.
Color temperature is the warmth or coolness of the light in kelvin. Lower numbers (2,700–3,000K) are warm and yellow; higher numbers (4,000–5,000K) are neutral-to-cool and read as “daylight.” For evening desk work I run warmer light; for daytime focus I push neutral. The detail that trips people up is matching the lamp’s color temperature to the monitor and the room so your eye is not whipsawing between a cool screen and a warm pool of lamplight. The full math — how many lumens for your desk size and which kelvin for time of day — lives in the desk lamp lumens and color temperature guide.
| Light layer | Job it does | Typical fixture | Where it sits | Color temp I run |
|---|---|---|---|---|
| Ambient | Lifts the whole room so the screen is not the only bright object | Ceiling light, floor lamp, smart bulb | Overhead or corner, never facing the screen | 2,700–4,000K |
| Task | Directed pool for notes, keyboard, handwork | Desk lamp, monitor light bar | Side of desk or clamped above the screen | 3,000–4,500K |
| Bias | Closes the contrast gap between screen and wall | LED strip, bias light bar | Behind the monitor, facing the wall | ~6,500K (match screen white) |
| Screen | Your primary surface — itself a light source | Monitor | Perpendicular to windows | Match to room brightness |
Monitor light bars: the best-value single upgrade
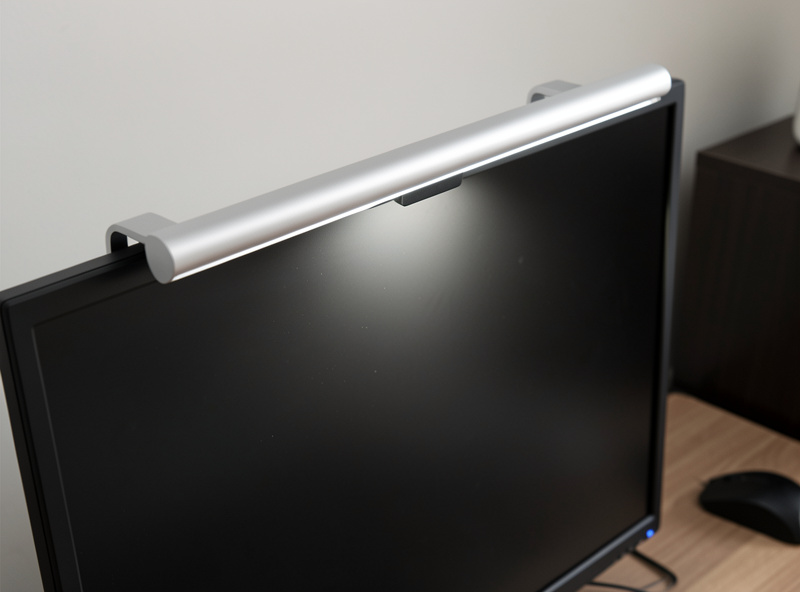
A monitor light bar is the fixture I recommend first to almost everyone, because it solves a desk-space problem and a glare problem at once. It clamps on the top edge of the monitor and throws an asymmetric beam down and forward onto the desk — the optics are designed so no light hits the screen and none hits your eyes. It frees the desk real estate a lamp would eat and it sits exactly where you need task light: over the keyboard and the space in front of it.
The things that separate a good bar from a gimmick are the beam asymmetry (does it actually keep light off the screen), adjustable color temperature, and a clamp or counterweight that fits your monitor’s top bezel thickness. I have run several and the cheaper ones can be perfectly good if the beam control is honest. As an Amazon Associate I earn from qualifying purchases. If you want to shop the category, monitor light bars on Amazon span the budget-to-premium range, and I break down what to actually look for in the best monitor light bar guide.
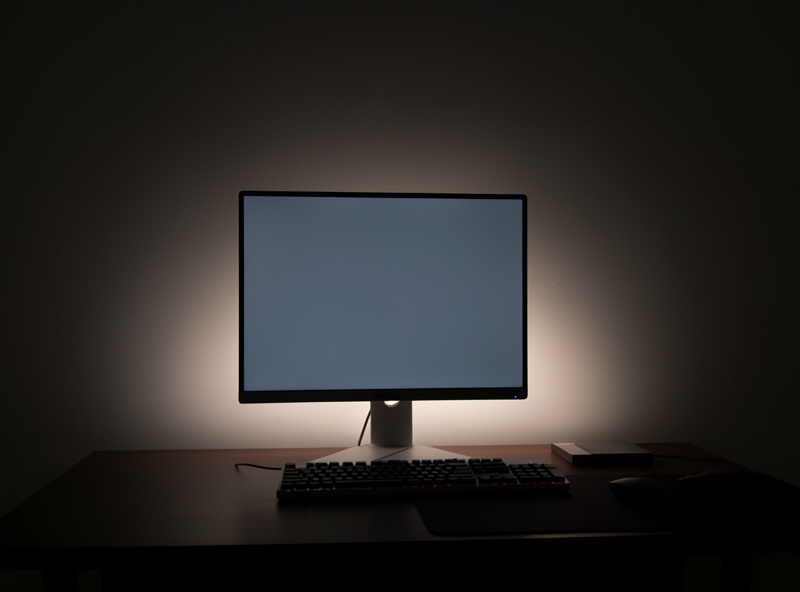
Bias lighting: the cheapest fatigue fix in the room
Bias lighting is a strip of light placed behind the monitor, pointed at the wall, so the area around the screen is gently lit instead of black. In a dark room a bright screen surrounded by darkness is a high-contrast scene, and your eye works to bridge that gap. A neutral-white glow behind the screen shrinks the contrast and most people report the screen feels easier to look at for long stretches. It is a low-cost strip and a USB port, and it is the upgrade I tell people to try before they spend on anything else for evening work.
The two things that matter are color temperature — aim for around 6,500K so the glow reads neutral against the screen’s white and does not tint your color perception — and placement, which should hug the back edges of the monitor evenly. The complete how-to, including why daylight-white beats RGB rainbow modes for actual comfort, is in the bias lighting behind the monitor guide.
Light bar vs desk lamp: which one you actually need
If your desk is small or cluttered, a monitor light bar usually wins because it uses zero desk surface and aims light where screen work happens. If you do a lot of physical, off-screen work — reading documents, drawing, soldering, anything with your hands away from the keyboard — a proper desk lamp with a flexible arm wins because you can put the cone exactly where the task is. Many desks, including mine, end up with both: a bar for the keyboard zone and a lamp for the side where paper happens.
It is not really an either/or for most people, but if you can only buy one, the deciding factor is whether your work is mostly on-screen (bar) or mostly off-screen (lamp). The full side-by-side — coverage, desk footprint, cost, adjustability — is in the LED light bar vs lamp comparison.
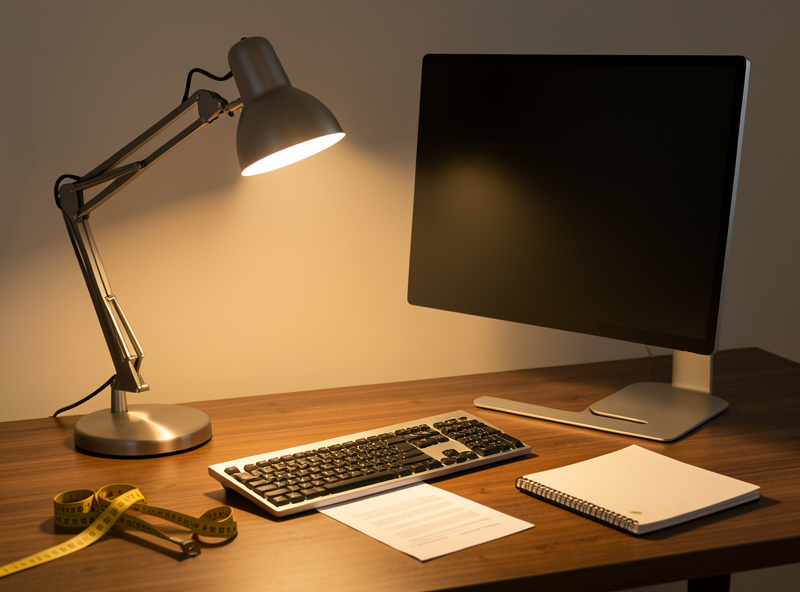
Task lighting for a real home office
Task lighting is the directed light that makes the actual work legible: the pool on your notebook, the light over a keyboard in a dim room, the beam on whatever you are building. A home office usually needs ambient light for the room plus one strong task source positioned for your dominant work. The mistake I see most is people buying one big bright lamp and calling it a day — that creates a hotspot and hard shadows instead of even, comfortable coverage.
How you position task light depends on handedness (light from the opposite side of your writing hand to avoid shadowing), the height of your work, and whether you share the room. I keep a small lamp on the off-hand side and the light bar over the keyboard, and that combination has been the most stable setup in my log. The room-by-room walkthrough is in the task lighting for home office guide.
Glare: the problem most people are actually trying to solve
When someone says their lighting is “bad,” nine times out of ten they mean glare — reflections on the screen or a bright source in their field of view. There are two kinds: direct glare (a bulb or window you can see while facing the monitor) and reflected glare (a light source bouncing off the screen into your eyes). You fix direct glare by moving the source out of your sightline; you fix reflected glare by changing the angle between the light, the screen, and your eyes — usually by tilting the monitor slightly down (negative tilt) or repositioning the light.
A matte screen helps, an anti-glare hood helps in extreme cases, and orienting the desk perpendicular to windows fixes more than any gadget. The systematic checklist — how to find the offending source and the order to try fixes in — is in the controlling monitor glare guide. Glare control overlaps heavily with screen geometry, so it pairs with my monitor arm guide for getting the tilt and position dialed.
Smart lighting: useful automation, not a gimmick
Smart desk lighting earns its keep when it removes a decision you would otherwise make badly — like warming the light automatically in the evening so you are not staring at cool daylight at 9pm, or dimming everything with one tap when you switch to video. The honest take is that the bulbs and bars themselves are rarely better than good dumb fixtures; you are paying for scheduling, scenes, and not getting up. For a desk, the high-value automations are time-of-day color temperature shifts and a single “work” scene that sets ambient, bias, and task levels together.
If you go smart, decide on an ecosystem before you buy hardware so everything talks to each other, and avoid lights that only work through a flaky app with no schedule. The full breakdown of what is worth automating at a desk — and what is just app friction — is in the smart desk lighting guide.
Eye comfort and what the research actually says
I keep this site firmly on the comfort-and-geometry side of the line, so here is the careful version: ergonomics and lighting researchers report that poor lighting — glare, low contrast, and big brightness differences across the field of view — is associated with visual fatigue and discomfort during screen work, and bodies like the Illuminating Engineering Society publish recommended light levels for office tasks for that reason. That is a comfort and visibility argument, not a medical one. I am not going to tell you a light bar prevents any condition — if your eyes hurt in a way that worries you, that is a question for an optometrist, full stop. What I can say from my own log is that matching screen brightness to the room, killing glare, and adding bias light made long evenings at the desk noticeably more comfortable.
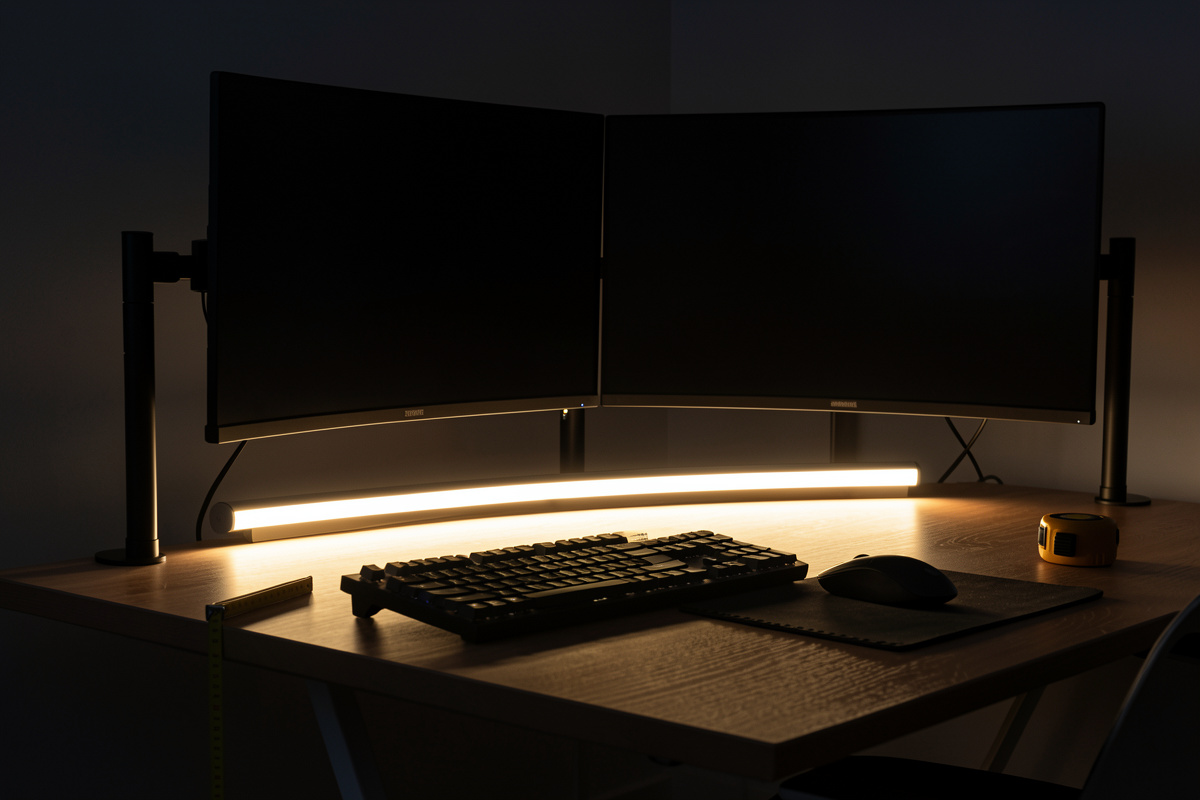
Lighting two monitors or an ultrawide
More screen means more light to balance. With dual monitors the bias light has to run behind both panels evenly, or one screen sits against a lit wall and the other against black — which reintroduces exactly the contrast gap you were trying to kill. For task light, a single monitor light bar usually only covers one screen well, so on a dual setup I either run a longer bar or fall back to a side lamp that washes the whole desk. With a curved ultrawide, a standard straight light bar can leave the far ends of the keyboard in shadow; longer bars or a bar plus a lamp solve it.
The geometry rule still holds: light comes from above-and-behind or from the side, never from in front. The wider your screen array, the more you should think in terms of even washes rather than tight pools, because a hotspot on a wide desk just makes the dim areas feel dimmer. This pairs with how I position wide displays on a monitor arm — get the screens placed and angled first, then light to match.
How to measure and dial in your own desk lighting
You do not need a light meter to fix desk lighting — you need a method, and your phone. Most phones have a free lux-meter app that is plenty accurate for relative comparisons. Sit where you work, put the phone face-up on the desk where your hands go, and read the lux. If it is well under ~400 for general work, add task light; if a number spikes when you tilt the phone toward a lamp or window, that source is a glare candidate. I log the reading for each configuration the same way I log desk height and monitor distance — numbers beat memory.
Then run the mirror test for glare: with the monitor off, sit in your normal position and look at the dark screen like a mirror. Every bright thing you can see reflected — a lamp, a window, a ceiling fixture — is a reflection you will fight when the screen is on. Move it, angle it, or shade it. Finally, the wall-match check for evening work: in a dim room, glance from the screen to the wall behind it. If the wall is much darker than the screen, your bias and ambient light are too low. Three checks, ten minutes, no purchases — that is the order I run before recommending anyone spend money.
Common desk lighting mistakes
The recurring ones I see: a single overhead light doing every job (creates screen reflections and harsh shadows); a bright lamp aimed at the desk in an otherwise dark room (huge contrast, tired eyes by evening); RGB bias lighting left on a saturated color (it tints how you perceive everything on screen — use neutral white); a lamp parked too far away so its rated lumens never become usable lux on the desk; and buying fixtures before fixing geometry, which is spending money to light a glare problem instead of removing it. Every one of these is free or cheap to fix once you know to look for it.
How I lit my own desk (the setup log version)
My current rig: a bias strip at ~6,500K hugging the back of the monitors, a monitor light bar over the keyboard set to a neutral white in the day and warmer at night, and a small articulating lamp on an Ergotron-class arm on my off-hand side for paper. The overhead room light is on a dimmer so the screen is never the brightest thing in a dark room. It took me a wasted winter running a single bright desk lamp in an otherwise black room — a textbook high-contrast setup — before I worked out the fix was less lamp and more wall glow, not a brighter bulb. Over a Nordic winter — where it is dark by mid-afternoon — that layered setup is the difference between fresh and fried by evening. I measured none of the “wellness” claims; I just logged which configurations I could sit through comfortably, and this is the one that stuck. Build your light in layers, fix the geometry before you spend, and add fixtures one at a time so you can feel what each one changes.
Frequently Asked Questions
What is the best lighting setup for a computer desk?
A layered setup: ambient room light, a task light (monitor light bar or desk lamp) for your work surface, and a bias light behind the screen. Aim for roughly 450 to 500 lux on the desk and keep every light source out of your direct sightline and off the screen face.
What color temperature is best for desk lighting?
Use warmer light (2,700 to 3,000K) for evening work and neutral light (around 4,000K) for daytime focus. For bias lighting behind the monitor, use around 6,500K so the glow reads neutral against the screen’s white instead of tinting your color perception.
How many lumens do I need for a desk lamp?
Target roughly 450 to 500 lux on the work surface for general computer work and 750 to 1,000 lux for fine detail. Because lux falls off with distance, a 400 to 600 lumen lamp placed close often beats a brighter one parked far away.
Is a monitor light bar or a desk lamp better?
A monitor light bar wins on small or cluttered desks and for mostly on-screen work because it uses no desk space and keeps light off the screen. A desk lamp wins for off-screen tasks like reading or handwork because you can aim the cone exactly where you need it. Many desks use both.
Does desk lighting reduce eye strain?
Lighting researchers report that glare, low contrast, and large brightness differences are associated with visual fatigue during screen work, and good lighting can improve comfort and visibility. That is a comfort argument, not a medical one. If your eyes hurt in a way that worries you, see an optometrist.
Where should a desk lamp be positioned?
Place the lamp to the side, on the opposite side from your writing hand to avoid casting a shadow, and angle the cone onto the desk rather than the monitor face. If you wear glasses, raise it higher and steepen the angle so it clears the lenses and does not reflect.